The procedure is divided into four steps:
A. Migration of MS OneDrive
B. Migration of MS OneNote
i. OneNote (Windows 10, Office 365)
ii. OneNote 2016
C. Switch MS Office license to use Connect tenant (if using MS Office 365)
D. Terminate MSSA tenant
A. Migration of MS OneDrive data
1. Assuming that MS OneDrive has already been installed, and which has been using MSSA tenant.
If you have installed MS OneDrive, the OneDrive app icon should be displayed in the lower right-hand corner of desktop.
2. By clicking on the above OneDrive app icon, please make sure “OneDrive is up to date”.
3. Press the above “Open folder” and OneDrive local folder will be shown.
In the above example, “My_MSSA_Folders” is the folder which has been using in MSSA tenant.
Please make sure that all OneDrive files are synchronised into the above local folder.
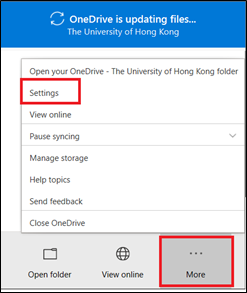
4. Right-click on MS OneDrive icon. Select “More” and then “Settings”.
5. Please press “Add an account”.
6. “Set up OneDrive” will be shown.
Please sign-in with Connect tenant, which domain name should be appeared as xxxx@connect.hku.hk (where ‘xxxx’ is your HKU portal ID).
Then, enter your PIN and press “Sign in”.
7. Press “Next”.
8. Select “Use this location”.
9. MS OneDrive will prompt for which files need to be synchronized. We assume that your “connect.hku.hk” OneDrive should not contain any file.
Press “Next” to continue.
10. Press “>” button to read introduction of OneDrive. Then, OneDrive local folders will be shown.
Two instances of OneDrive are connected into your local computer, which in the above example are:
-
“OneDrive – The University of Hong Kong”: MSSA tenant
-
“OneDrive – connect.hku”: Connect tenant
11. You may move/copy files from MSSA tenant to Connect tenant.
12. After all files have been migrated into Connect tenant, you may unlink MSSA tenant from your local computer.
Please right-click the “OneDrive – The University of Hong Kong” icon.
When you place mouse pointer over OneDrive icon, the name of MSSA tenant is displayed, e.g. “OneDrive – The University of Hong Kong”.
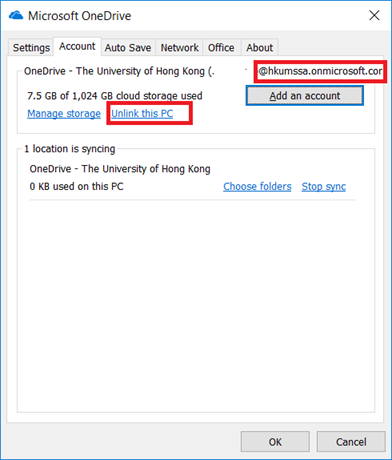
13. Please right-click the “OneDrive – The University of Hong Kong”. Then, select “More” and “Settings”.
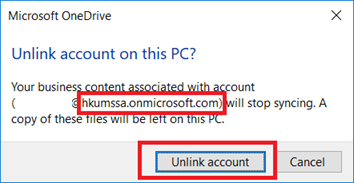
14. Make sure that it is MSSA tenant by looking for domain name of @hkumssa.onmicrosoft.com. Then, select “Unlink this PC”.
Press “Unlink account” to confirm.
15. Now, there will be only one MS OneDrive icon linked with your PC, which is the Connect tenant.

B. Migration of OneNote from MSSA to Connect tenant
Please select the version of OneNote that you have installed:
i. OneNote (Windows 10 , Office 365, Office 2019)
ii. OneNote 2016
i. OneNote (Windows 10 , Office 365)
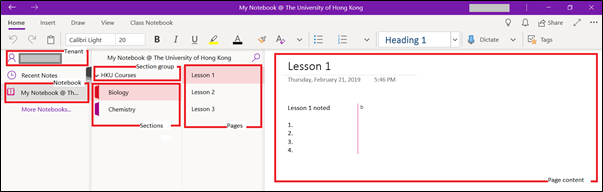
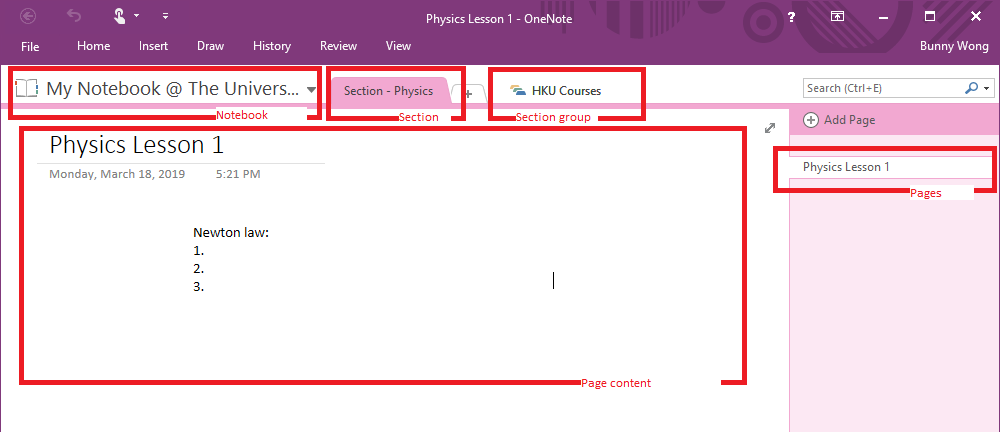
1. After you have logged in OneNote (with MSSA tenant), the “Notebook”, “Section group”, “Section”, “Pages” will be loaded into your desktop application.
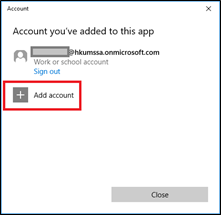
2. Press the login icon to login Connect tenant.

3. Press “Add account”.
4. Select “Work or school account” and press “Continue” button.

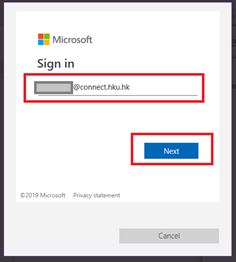
5. Please login your Connect tenant. Then, press “Next” button.
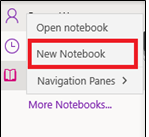
6. After you have login with OneNote with your Connect tenant, please right-click login icon and select “New Notebook”.
7. Please give a name (e.g. “Notebook-Connect”) for the new notebook and select the Connect tenant.
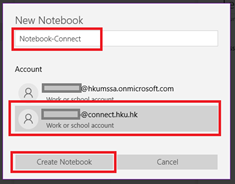
Please “Create Notebook”.
8. A new Notebook of Connect tenant is created, e.g. “Notebook-Connect”.

9. Please select MSSA tenant. Then, right-click on ‘section group’ which you want to move to Connect tenant.
Then, select “Move”.

10. Select the Notebook that you have just created (e.g. “Notebook-Connect” in the above example).
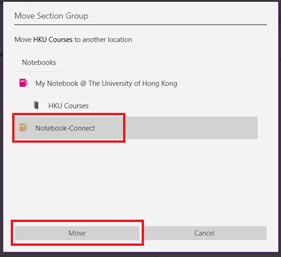
Press “Move” if Connect tenant is selected.
Then, please wait while OneNote is synchronizing.
OneNote is synchronizing the Notebook. Please wait until it finishes.
11. After OneNote has finished synchronization, the selected “section group” should be moved from MSSA tenant to Connect tenant.
12. Please repeat the above steps #10 to #12 if you have more than one “section group” in MS OneNote.
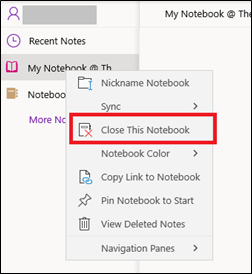
13. Close MSSA tenant by right-clicking the “Notebook” and then “close This Notebook”.
14. You should continue to work with one single OneNote in Connect tenant.
15. To sign-out with OneNote account of MSSA tenant, please press the button “…” and select “Settings”.
Then, select “Accounts”.
16. Sign out the MSSA tenant by pressing “Sign out”.
Press “Remove” to confirm.
17. Restart OneNote to make sure your Notebook has been moved from MSSA tenant to Connect tenant.
Please continue with
Step C after you have migrated OneNote.
ii. OneNote 2016
RPG students are advised to upgrade OneNote 2016 to OneNote for Windows 10. Please click here for details.
If you may want to continue with OneNote 2016, please follow the instructions below:
1. After you have logged in OneNote 2016 (with MSSA tenant), the “Notebook”, “Section group”, “Section”, “Pages” will be loaded into your desktop application.
2. Right-click on the Notebook of MSSA tenant and select “Share This NoteBook”.
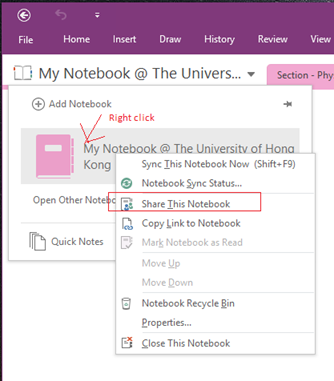
Please share your MSSA’s Notebook with your Connect tenant.
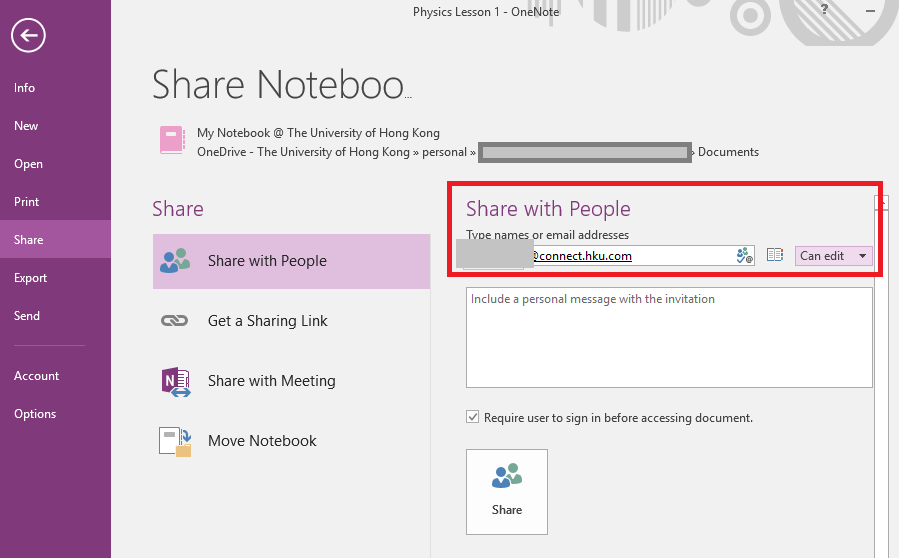
Input your Connect tenat emaill address (in domain name of @connect.hku.hk).
Choose “Can edit” and press “Share”.
3. Go back to OneNote 2016 startup screen.
Click login (displayed as your name) and select “Account settings”.
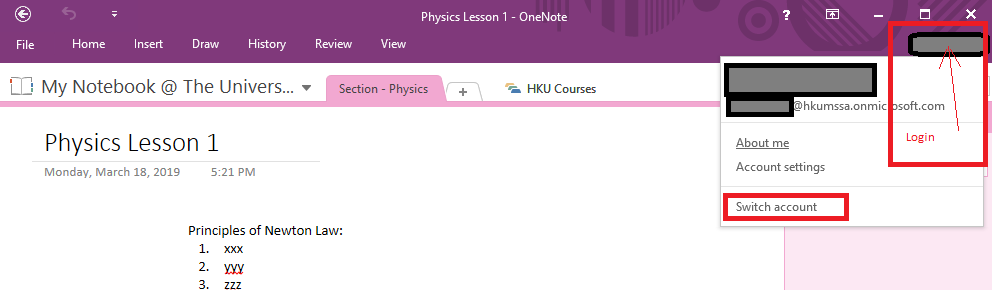
4. Press “Switch Account”.
Press “Add Account” and sign in with your Connect tenant.
5. OneNote 2016 will be switched with your Connect tenant.
6. Please go back to Notebook 2016 startup screen.
By clicking the Notebook in OneNote 2016, you will see your Notebook. Please select “Add Notebook”.
7. Please select “OneDrive – connect.hku.hk” for the “New Notebook”.
Give a name of new notebook (e.g. Notebook-Connect).
Press “Create”.
8. Two Notebooks are now connected in your OneNote 2016.
In the above example,
“My Notebook @ The University of Hong Kong” = MSSA tenant;
“Notebook-Connect” = Connect tenant.
Please right-click the Notebook of Connect Tenant and synchronise with it.
Wait until it finishes the sync.
9. Select the Notebook of MSSA tenant. Then, right-click on the “Section” (or “Section Group”).
Select “Move or Copy” and choose the Notebook of Connect tenant.
Press “Move”.
The “Section” (or “Section group”) of MSSA tenant should be moved into Connect tenant (e.g. Notebook-Connect in the above example).
8. Repeat the last two steps if you may have more than one “Section” (or “Section group”).
In the above example, we can move “Section group” (e.g. “HKU courses”).
10. The Notebook of Connect tenant should be migrated with the content from MSSA tenant.
In the above example, “Notebook-Connect” is the Notebook of Connect tenant, where “Section – Physics” and “HKU Courses” are the “Section” and “Section group” respectively.
Please make sure the Notebook of MSSA tenant is migrated to Connect tenant.
11. Right-click the Notebook of MSSA tenant and select “Close this Notebook”.
12. Press “SIGN OUT”.
Locate the MSSA tenant and press “sign out”.
Press “Yes” to confirm to remove account.
C. Switch MS Office license to use Connect tenant
Please skip this section if you are not using license of MS Office 365.
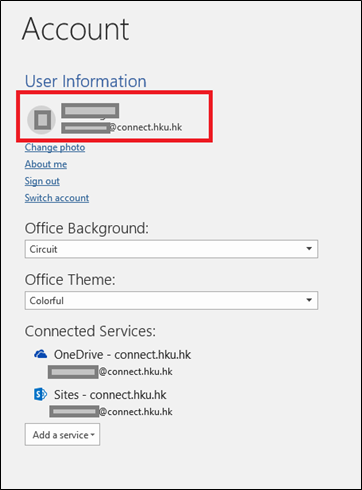
1. In MS Office, e.g. MS Word, click “File” menu -> “Account” and press “sign-out”.
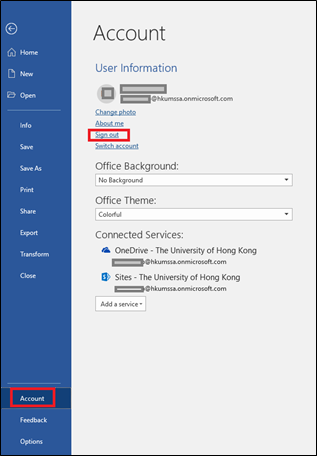
After you have signed out MS Office, it will ask you for a new login.
In this case, please press “Sign in” button and then sign in with your Connect tenant.
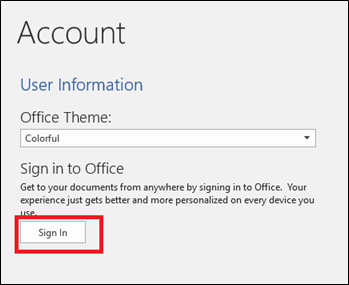
Please follow Microsoft’s instructions to ‘sign in’ with your Connect tenant.
After you have successfully signed in, login ID with Connect tenant will be used.
2. The license may still be bound to MSSA tenant. In this case, we need to switch MS Office license to use Connect tenant. Please click MS Office “File” menu -> “Account”.
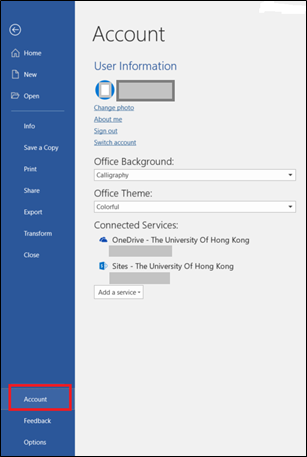
Press the “Manage Account” button.
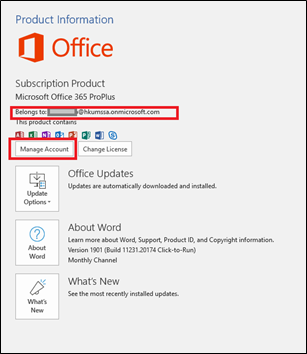
3. MS Office will redirect you to MS Office login. In this case, please choose your MSSA tenant to login.
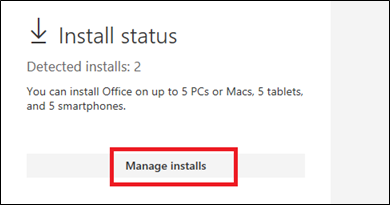
4. Under “Install status”, press “Manage installs”.
5. Deactivate all PCs or MACs which you have installed MS Office.
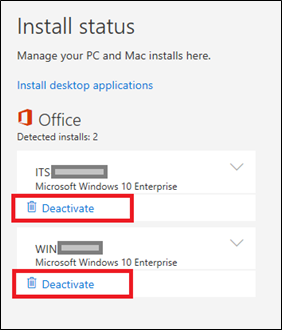
Make sure that you have deactivated all PCs or MACs to use MSSA tenant of installations of MS Office desktop applications.
“Detected installs” should be zero (“0”) in this case.
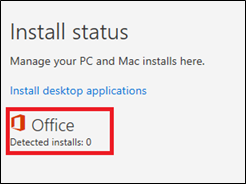
Close all the browser sessions to make sure the logout of MS Office page.
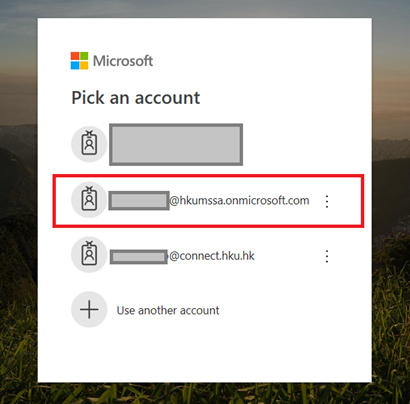
6. Now, we switch MS Office license to use Connect tenant.
Please again click the “File” menu -> “Account”, then press “Manage Account” in your MS Office application, e.g. MS Word.
It will again redirect you to MS Office login page.
In this case, please login your Connect tenant:
You will login to MS Office page.
Press “Install desktop applications” to reinstall MS Office.
Please follow the instructions from the MS Office program to install the desktop applications.
7. After MS Office desktop applications have been installed successfully, the license of Connect tenant shall be used.
8. Repeat the above #6 and #7 if you have installed MS Office for more than one PCs or MACs.
9. Please check whether all your files and data have been migrated from MSSA tenant into Connect tenant for each PC or MAC that you have installed MS Office.
After you have verified all files and data have been migrated, please send an email to ithelp@hku.hk. We will terminate the MS Office license of your MSSA tenant after receiving your email.


